Now for something a bit off-topic. As a side project I handle a friend’s company’s website. He asked me to add a button that links to his facebook page and another button that opens the review form for his company’s google page.
Easy peasy. I made two images and embedded them in a link element:
As expected everything worked as expected. Not exactly rocket science.
Until I looked at the webpage in Mobile Safari. The two buttons were not showing up there. They were showing in Chrome for iOS but in Mobile Safari: no Facebook button, no Google button!
As it turned out the image filenames were the problem. Naming them “btn-facebook.png” and “btn-google.png” was triggering my Mobile Safari’s content blocker app!
The solution was really simple. Just renaming the image filenames did the trick:
Who doesn’t love the “Swipe Back” gesture to navigate back to the previous view controller? I rarely use the back button in the left upper corner of the screen anymore. Especially when you are holding your phone in one hand it is much more easy to just swipe back.
The best thing is that as a developer you don’t have to do anything to enable this swipe back functionality as it already part of UINavigationController.
On initialization UINavigationController installs a UIScreenEdgePanGestureRecognizer on its view to handle the interactive pop gesture (aka “Swipe Back” gesture). You can access the gesture recognizer via the interactivePopGestureRecognizer property.
Now, when you decide to replace the default back button with your own custom back button you will see that the “Swipe Back” Gesture is not working anymore. Apparently the UIScreenEdgePanGestureRecognizer’s delegate only allows the gesture to be recognized when it sees that the default back button is being used. Bummer!
To make the “Swipe Back” work again you have to bypass the delegate that disables the gesture. If found some suggestions that would simply set the delegate to nil. This seems to work at first. But when you start playing around with your app after doing that you will eventually see that the app freezes and does not recognize ANY touches anymore. This happens when you swipe back while the navigation controller is pushing a view controller. Not good!
So you have to set the delegate yourself and implement gestureRecognizerShouldBegin(_:) to disable the gesture whenever the navigation controller is pushing a view controller.
The easiest way to do this is to subclass UINavigationController:
To block the “Swipe Back” gesture there is a boolean property isPushingViewController that is true when the navigation controller is pushing a view controller. [// 1]
Setting the property to true is easy. We simply override pushViewController(_:animated:) and set isPushingViewController to true [// 2]
To be able to set it back to false when the view controller has been pushed we have to know when the push is completed. Luckily there is a UINavigationControllerDelegate method that we can use. So we set our UINavigationController subclass’ delegate to self [// 3] and implement navigationController(_:didShowViewController:animated:) to set isPushingViewController back to false [// 4]
Now all that is left is to also set the interactivePopGestureRecognizer‘s delegate to self [// 5] and to only allow the gesture when isPushingViewController is false. And while we are at it we also make sure that the swipe back makes sense. In other words we check if the navigation controller has more than one view controller on his stack. Otherwise we ignore the gesture. [// 6]
Yay, “Swipe Back” is back!
But wait a minute. What happens when someone is using this UINavigationController subclass and needs to set the delegate themselves:
let navigationController = InteractivePopNavigationController()
navigationController.delegate = self
This won’t work, because we are overwriting the delegate in our subclass’ viewDidLoad method.
To make this work, we need to keep a reference to the delegate before overwriting it and forward all delegate method calls to it:
// 1: We use the didSet property observer on the delegate property. Whenever the delegate is being set we check if our subclass itself is the delegate (we don’t do anything so the subclass will be set as its own delegate). If the delegate is of any other class we do not set it as delegate but keep a reference to it.
// 2: We implement the UINavigationControllerDelegate method that we use to see when the pushing is completing. In this method we set isPushingViewController back to false. We also forward the call to our external delegate.
Unfortunately we have to forward ALL methods that are defined in UINavigationControllerDelegate to out external delegate to make the external delegate fully functional. This is not an ideal solution. When Apple decides to add methods to UINavigationControllerDelegate in the future they will have to added here. Or they won’t be called when setting the delegate manually. In Objective-C you could use the NSInvocation API to handle this, but that API is not available in Swift. I have not found a way to forward all delegate methods to the external delegate in Swift. I you know a way to do this, please leave a comment!
And so, with a little bit of work, we can use the Interactive Pop Gesture (aka “Swipe Back”) even when we are not using the system default back button.
Auto Layout and UIScrollView seem to be a popular, but sometimes problematic couple. So here is another post about this topic. This time we will take a couple of subviews, add them to a UIScrollView and make everything work by programmatically adding layout constraints.
Because I am a lazy guy, we will use SnapKit (a.k.a. TheFrameworkFormerlyKnownAsMasonry) for the Auto Layout stuff. And because I get bored easily and I have already written a post about a vertical UIScrollView with Auto Layout, we’ll do a horizontal UIScrollView this time. Yay!
So, let’s take 4 empty UIViews and give them each a different background color, so that we can see the scrolling. To make things simple we make each subview the same size as the scrollview (so each subview covers the whole visible area).
Here is the code, you’ll find some explanations below it:
import UIKit
import SnapKit

class ViewController: UIViewController {

    let scrollView = UIScrollView()
    let subViews = [UIView(), UIView(), UIView(), UIView()]
    let colors = [UIColor.greenColor(), UIColor.blueColor(), UIColor.redColor(), UIColor.orangeColor()]

    override func viewDidLoad() {
        super.viewDidLoad()

        // 1
        view.addSubview(scrollView)
        scrollView.snp_makeConstraints { (make) in
            make.edges.equalTo(view)
        }

        // 2
        subViews.enumerate().forEach { index, subview in
            subview.backgroundColor = colors[index]
            // 3
            scrollView.addSubview(subview)
            subview.snp_makeConstraints(closure: { (make) in
                // 4
                make.top.equalTo(0)
                make.size.equalTo(scrollView)
                switch index {
                // 5
                case 0:
                    make.left.equalTo(0)
                // 6
                case subViews.count - 1:
                    make.left.equalTo(subViews[index - 1].snp_right)
                    make.right.equalTo(0)
                // 7
                default:
                    make.left.equalTo(subViews[index - 1].snp_right)
                }
            })
        }
    }
}
First we add the UIScrollView to the UIViewController and set its size to the size of the UIViewController’s view. // 1
We iterate over the subviews // 2, add them to the UIScrollView // 3 and add the Auto Layout constraints following this 4 simple rules:
1. All subviews have a top constraint of 0 and a size constraint that is equal to the scroll view. // 4
2. The first subview (in other words the leftmost subview) has a left constraint of 0 // 5
3. The last subview (the rightmost subview) has a right constraint of 0 // 5
4. All other subviews have a left constraint to the right of the previous subview // 6
And that’s all. When you run this code you can rotate the device to see that the subview sizes and the UIScrollView’s contentSize are adjusted automatically. If you don’t want the UIViews to be resized you just have to give them a static size.
This example also works for a vertical UIScrollView. Just connect the top and bottom constraints of the subviews instead of the left and right constraints. See the blog post I mentioned above for more details.
So you have developed this nice Share Extension to share images. Everything works fine when you select “share” in the Photos App: Your extension is visible and you can use it to share photos from your phone’s photo library.
But then you try to share images from a webpage in Mobile Safari. You press the Share Icon and … your Share Extension does not show up 🙁
What went wrong?
The solution to this problem lies in your Share Extension’s plist file. There you define what types of files your Share Extension can share. Because in your case the Share Extension only accepts image files this should be fine:
Xcode has a neat built in feature that let’s you simulate a (GPS) location in the iOS Simulator. To switch it on you just need to run your app in the Simulator and then click on the location arrow on top of the debug area. Xcode offers a handful of default locations from Moscow to Honolulu that you can use if you just need any location.
Cool!
But sometimes you need to simulate a certain location that is not part of that default set. For example, let’s say you are developing an app that shows all the cool bars in your hometown. Then being able to simulate the location “Honolulu” won’t be of much use to you (unless your hometown in Honolulu).
Luckily Xcode offers the possibility to add a GPX file to your project that defines the location you would like to simulate. GPX is a XML Format for GPS data. It has a large set of datatypes but to simulate a location we only need the wpt (waypoint) datatype:
To add your custom location to the Simulator you have to add a GPX file to your project. Xcode offers this file type in its New File dialog (File -> New -> File… -> Resources -> GPX File) but it is just a plain XML file so you can create it somewhere else and just add it to your project (just make sure it has a “.gpx” file ending).
So to simulate the location add the following GPX file to your project:
Now if you run your app in the Simulator and click on the location arrow on top of the debug area, you will find your custom location on top of the default locations (Xcode displays the file name of your GPX file as the name of your custom location). Select it and the Simulator pretends to be at that location.
Very cool!
But it gets better! What if a static location is still not enough for you? Say, you want to add a feature to your “Best Bars in my Hometown”-App that allows the user to track his way home after his visit to the bar (So he can see the next day how he got home in case he can’t remember…). To test that feature you would have to make the Simulator pretend to be moving from one location to another.
This is where a second GPX datatype comes into play: the time data type. When you add a time element to a waypoint element and you have multiple waypoint elements Xcode simulates a movement between those waypoints:
When you select this GPX file from the list of locations Xcode starts to simulate a movement from the first waypoint to the second waypoint and then to the third.
The speed of this movement is determined by the value of the time elements. The absolute time does not matter. Xcode only uses the time difference between the waypoints to calculate a speed. So in my example it takes the Simulator 1 minute to “move” from the first waypoint to the second waypoint and then another minute before it reaches the third waypoint.
In a previous post I described how to programmatically set the height of a UIWebView to fit the height of its HTML content.
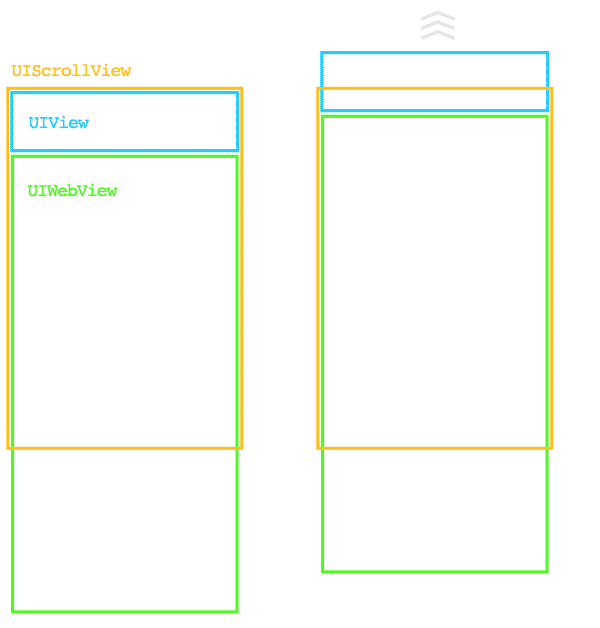
This is a different approach using a Storyboard (and a little code). To make things a little bit more interesting I added an UIView that sits on top of the UIWebView and that should scroll out of view when the user scrolls the UIWebView. To make that happen we need an UIScrollView that contains the UIView and the UIWebView:
The UIView could be something like an iAd that you want to display on top of the web content but that should be scrolled out of the view when the user scrolls the web content.
Here is how to make it work:
Connect the UIWebView from the nib to an outlet in your view controller.
Disable scrolling in the UIWebView.
Set the constraints on the `UIScrollView`, the `UIView` and the `UIWebView`:
The UIScrollView needs a top, a bottom, a leading and a trailing constraint to the UIViewController’s view.
The UIView needs a top, a leading and a trailing constraint to the UIScrollView. It also needs a width constraint that is equal to the UIScrollView’s width to avoid horizontal scrolling (See this post for an explaination). I also add a height constraint, because I want to have the UIView to have a constant height of 100pt.
The UIWebView needs a top constraint to the UIView’s bottom, a leading, a trailing and a bottom constraint to the UIScrollview. It also needs a height constraint that we will later set to the height of the HTML content
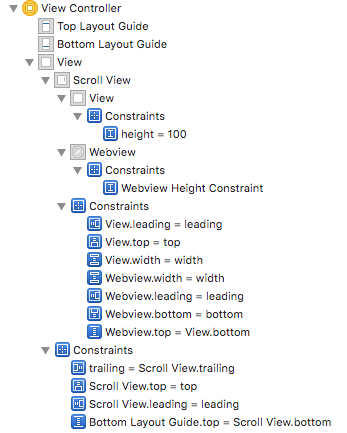
The constraints should look like this:
Connect the UIWebView‘s height constraint to an outlet in your view controller.
Set the view controller as UIWebViewDelegate.
In webViewDidFinishLoad set the height constraint’s constant to the height of the contentSize of the scroll view inside the web view.
Start Key-Value Observing on the contentSize to change the height, when height of the web view has to change because segments of the webpage change their size without reloading the page (like accordeons, or menus). Don’t forget to stop observing when the view controller gets deallocated.
When you have a UITableView with a lot of sections a section index can be very useful to jump quickly between sections. A good example for this is you iPhone’s address book.
But sometimes you want to hide the section index until the user scrolls the table view. The problem is that you can neither hide or show the section index directly nor officially access the UIView that holds the section index.
However there is a little trick to fade the section index in and out. UITableView has two methods that allow you to set the background and the text color of the section index. When you change the alpha of those two colors according to the UITableView’s contentOffset you can fade the section index when the user scrolls:
Some people still seem to struggle when it comes to using Apple’s Auto Layout in a UIScrollView. There are a lot of questions on StackOverflow like “Why is my UIScrollView not scrolling when using AutoLayout?”
So here is a short explanation on how to use Auto Layout with a UIScrollView that should scroll vertically:
There are just a few things you have to take care of:
1. The topmost subview must have a top constraint with the UIScrollView
2. All other subviews must have a top constraint with the bottom constraint of the subview above them
3. The bottommost subview must have a bottom constraint with the UIScrollView
To ensure that the UIScrollView only scrolls vertically you have to make sure that its subviews don’t become wider than the UIScrollView.
Do not rely on left and right constraints to define the width of a subview. If for example you have a UILabel that has a lot of text and should break into several lines, it just won’t, even if you set its numberOfLines property to 0. That’s because the UIScrollView will give it enough space by allowing horizontal scrolling. So if you just set a left and right constraint on the UILabel the UIScrollView will scroll horizontal and the label will be very wide and have only 1 line.
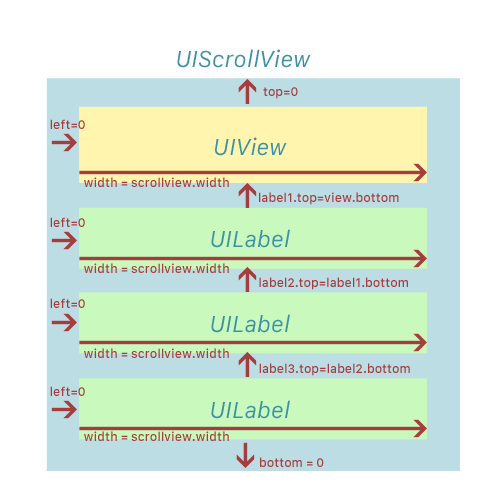
Instead you should define a left and a width constraint. Set the width constraint to the width of the UIScrollView and the UILabel will not become wider than the UIScrollView. It will wrap into multiple lines instead.
If you follow those steps you don’t have to set the UIScrollView’s contentSize property any more to make the UIScrollView scroll. Auto Layout will handle that for you.
To make it more clear, here is an image with the constraints that you have to set:
If you are using Masonry or SnapKit here is a code example on how to set the constraints programmatically:
I just stumbled upon a bug that seems to be introduced in iOS9. When a user tries to buy a product via In-App Purchase and then cancels the process when he is asked if he really wants to buy the product a wrong error type is returned by Apple.
When the user presses “Cancel” in the UIAlertView the SKPaymentTransactionObserver method paymentQueue:updatedTransactions: gets called. The cancellation is handled like an error with the error type SKErrorPaymentCancelled. You can check for this error type because you don’t really want to show an error page when the user cancelled the purchase process. It’s not really an error but the user’s free will. So you only show an error message for the other error types:
- (void)paymentQueue:(SKPaymentQueue *)queue updatedTransactions:(NSArray *)transactions {
    for (SKPaymentTransaction *transaction in transactions) {
        switch (transaction.transactionState) {
            case SKPaymentTransactionStateFailed:
                if (transaction.error.code == SKErrorPaymentCancelled) {
                   // just cancel the purchase process without
                   // showing an error message
                } else {
                   // show an error message
                }
                break;
            default:
                break;
        }
    }
}
So far, so good. Unfortunately under iOS9 when the user cancels the error type SKErrorUnknown is returned from Apple. That is unfortunate as it results in an error message being displayed when the user pressed “Cancel”. Somehow the correct error type SKErrorPaymentCancelled got lost in iOS9.
That is unfortunate, because we really don’t want to show the error message when the user cancels the purchase process. I do not see a solution for this problem as we cannot suppress all error messages of type SKErrorUnknown.
I filed a radar. Would be nice if Apple would fix that soon. Well, we know how seriously Apple treats radars, but hey, one can dream…
UPDATE: This is now fixed with the iOS9 release version
One of the new operators that comes with Swift is the Nil Coalescing Operator. In the documentation it is explained as: The nil coalescing operator (a ?? b) unwraps an optional a if it contains a value, or returns a default value b if a is nil.
This operator already exited in C but for Objective-C developers it is kind of new (more about that at the bottom of this post).
With this operator assigning values to a property with a fallback to a default value becomes really concise:
Instead of doing this:
func setupBackgroundColor(color: UIColor?) {
   if (color != nil) {
      backgroundColor = color
   } else {
      backgroundColor = UIColor.whiteColor()
   }
}
You can simply do this:
func setupBackgroundColor(color: UIColor?) {
        backgroundColor = color ?? UIColor.whiteColor()
}
Pretty cool, isn’t it?
Actually something like this was already possible with Objective C: