PIXEL
DOCK

I like the smell of Swift in the morning…

Programmatically add a dynamic number of subviews to a UIScrollView using Auto Layout

Posted: | Author: | Filed under: iOS, Swift | Tags: , , | No Comments »

Auto Layout and UIScrollView seem to be a popular, but sometimes problematic couple. So here is another post about this topic. This time we will take a couple of subviews, add them to a UIScrollView and make everything work by programmatically adding layout constraints.

Because I am a lazy guy, we will use SnapKit (a.k.a. TheFrameworkFormerlyKnownAsMasonry) for the Auto Layout stuff. And because I get bored easily and I have already written a post about a vertical UIScrollView with Auto Layout, we’ll do a horizontal UIScrollView this time. Yay!

So, let’s take 4 empty UIViews and give them each a different background color, so that we can see the scrolling. To make things simple we make each subview the same size as the scrollview (so each subview covers the whole visible area).

Here is the code, you’ll find some explanations below it:

import UIKit
import SnapKit

class ViewController: UIViewController {
    
    let scrollView = UIScrollView()
    let subViews = [UIView(), UIView(), UIView(), UIView()]
    let colors = [UIColor.greenColor(), UIColor.blueColor(), UIColor.redColor(), UIColor.orangeColor()]

    override func viewDidLoad() {
        super.viewDidLoad()
        
        // 1
        view.addSubview(scrollView)
        scrollView.snp_makeConstraints { (make) in
            make.edges.equalTo(view)
        }
        
        // 2
        subViews.enumerate().forEach { index, subview in
            subview.backgroundColor = colors[index]
            // 3
            scrollView.addSubview(subview)
            subview.snp_makeConstraints(closure: { (make) in
                // 4
                make.top.equalTo(0)
                make.size.equalTo(scrollView)
                switch index {
                // 5
                case 0:
                    make.left.equalTo(0)
                // 6
                case subViews.count - 1:
                    make.left.equalTo(subViews[index - 1].snp_right)
                    make.right.equalTo(0)
                // 7
                default:
                    make.left.equalTo(subViews[index - 1].snp_right)
                }
            })
        }
    }
}

First we add the UIScrollView to the UIViewController and set its size to the size of the UIViewController’s view. // 1
We iterate over the subviews // 2, add them to the UIScrollView // 3 and add the Auto Layout constraints following this 4 simple rules:

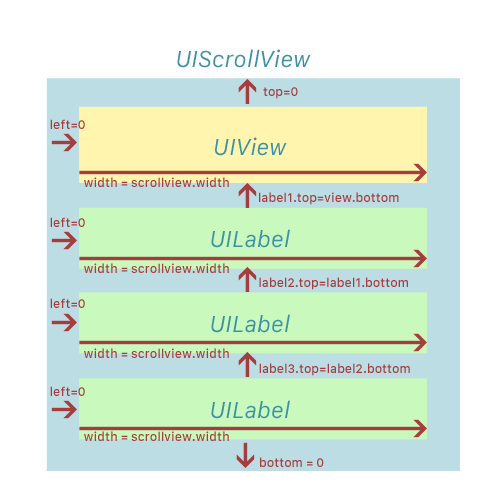
1. All subviews have a top constraint of 0 and a size constraint that is equal to the scroll view. // 4
2. The first subview (in other words the leftmost subview) has a left constraint of 0 // 5
3. The last subview (the rightmost subview) has a right constraint of 0 // 5
4. All other subviews have a left constraint to the right of the previous subview // 6

And that’s all. When you run this code you can rotate the device to see that the subview sizes and the UIScrollView’s contentSize are adjusted automatically. If you don’t want the UIViews to be resized you just have to give them a static size.

This example also works for a vertical UIScrollView. Just connect the top and bottom constraints of the subviews instead of the left and right constraints. See the blog post I mentioned above for more details.

UIScrollView and Auto Layout.

Posted: | Author: | Filed under: iOS, Swift | Tags: , , | 9 Comments »

Some people still seem to struggle when it comes to using Apple’s Auto Layout in a UIScrollView. There are a lot of questions on StackOverflow like “Why is my UIScrollView not scrolling when using AutoLayout?”

So here is a short explanation on how to use Auto Layout with a UIScrollView that should scroll vertically:

There are just a few things you have to take care of:

1. The topmost subview must have a top constraint with the UIScrollView
2. All other subviews must have a top constraint with the bottom constraint of the subview above them
3. The bottommost subview must have a bottom constraint with the UIScrollView

To ensure that the UIScrollView only scrolls vertically you have to make sure that its subviews don’t become wider than the UIScrollView.

Do not rely on left and right constraints to define the width of a subview. If for example you have a UILabel that has a lot of text and should break into several lines, it just won’t, even if you set its numberOfLines property to 0. That’s because the UIScrollView will give it enough space by allowing horizontal scrolling. So if you just set a left and right constraint on the UILabel the UIScrollView will scroll horizontal and the label will be very wide and have only 1 line.

Instead you should define a left and a width constraint. Set the width constraint to the width of the UIScrollView and the UILabel will not become wider than the UIScrollView. It will wrap into multiple lines instead.

If you follow those steps you don’t have to set the UIScrollView’s contentSize property any more to make the UIScrollView scroll. Auto Layout will handle that for you.

To make it more clear, here is an image with the constraints that you have to set:

scrollview_al

If you are using Masonry or SnapKit here is a code example on how to set the constraints programmatically:

topView.snp_makeConstraints { (make) -> Void in
    make.top.equalTo(0)
    make.left.equalTo(0)
    make.width.equalTo(scrollView)
}
label1.snp_makeConstraints { (make) -> Void in
    make.top.equalTo(topView.snp_bottom)
    make.left.equalTo(0)
    make.width.equalTo(scrollView)
}
label2.snp_makeConstraints { (make) -> Void in
   make.top.equalTo(label1.snp_bottom)
   make.left.equalTo(0)
   make.width.equalTo(scrollView)
}
label3.snp_makeConstraints { (make) -> Void in
    make.top.equalTo(label2.snp_bottom)
    make.left.equalTo(0)
    make.width.equalTo(scrollView)
    make.bottom.equalTo(0)
}